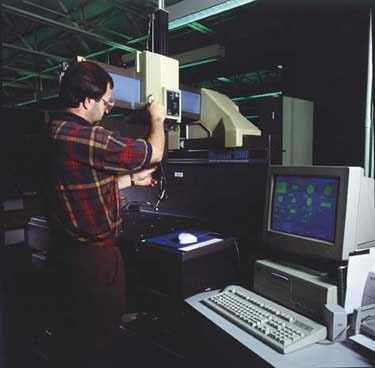
Icon-based Software Gives CMM a Second Chance
Machine gets a productivity boost with measurement software from Brown & Sharpe.
What's the quickest way to rejuvenate an older manual coordinate measuring machine? Add icon-based measurement software.
That's exactly what Consolidated Diesel Co. did. The Whitakers, NC-based company, a joint venture of Case Corp. and Cummins Engine Co., manufactures mid-range diesel engines for automotive, agricultural, and marine applications, as well as for generators and other uses. Its Dimensional Compliance Assurance Department was using a manual Cordax CMM, which was an accurate and reliable workhorse, according to Dean Wicker, in quality resource. However, the software no longer had the flexibility to keep pace with increasingly sophisticated measurement requirements for the company's production part approval process.
Consolidated Diesel solved the problem by upgrading its Cordax CMM with Micromeasure III geometric software from Brown & Sharpe, Inc. (North Kingstown, RI). Now the Cordax offers improved measuring capabilities and is used more often. Originally developed in conjunction with the award-winning Microval personal CMM, Micromeasure was the first CMM software to use icons to simplify the selection and execution of measurement routines. It uses the same concepts to simplify the creation of complex measurement programs for manual CMMs.
"In my experience, it takes about six months to develop a working familiarity with a CMM software package, three years to become an accomplished user, and five years to be an expert," said Wicker. "On a subjective proficiency rating scale of 1 to 10, we have arrived at about a 6 or 7 with Micromeasure in just three months. That is very good."
Wicker was impressed with the logical structure of Micromeasure III because it made the software easy to learn and use. "It's almost self-training," he noted.
Improving Throughput
The simple types of walkup measurements the Cordax originally performed still account for about 40% of the work the machine does. Because of the simplicity of the icon-based software, Wicker estimates that this work is being performed about 20% faster.
Micromeasure III can measure more than one of the same part, making it easy for Consolidated Diesel to blast through multiples. The software essentially creates a part program as the first piece is being measured. Subsequent pieces are measured in a fraction of the time.
"If a technician is having some problems, I can go into the program and walk through it to see where he or she was getting hung up. I can also edit it anywhere I want. Once we have a program, we can jump into it anywhere, if we just need to measure a few part features instead of the entire part," explained Wicker.

Simple Graphics Aid Communication
The software automatically generates graphic outputs that indicate straightness, flatness, and roundness. The picture is very helpful in communicating what needs to be changed back to the customers. The program also can be used with a graphic file generated in software such as AutoCAD to produce a comparative analysis between the CAD nominal file and the part being measured. Consolidated Diesel has used this capability to evaluate castings.
Working with the software, the CMM can now measure objects that wouldn't have been tried before, including the intersection of bends in tubing, cylinder intersections, and contours. Other parts the CMM can work with are rocker levers and fuel tubes. Measuring the rocker levers used to require compound rotations, where the part would be flipped to measure points that were otherwise inaccessible. The new software allows the CMM to measure their intersection and angles.
The CMM also can measure tubes, giving the department the ability to evaluate the conformity of tube curvature to nominal. This was invaluable when the department was asked to respond to a production problem and, within two hours, identify problems with a supplier's tubing. Wicker said this type of problem formerly would have taken days to resolve.
Better Resource Allocation
In the past, parts such as the rocker arms or the tubing would have been measured on the company's ultraprecision CMM, even though the Cordax was accurate enough to measure them. By measuring these parts on the Cordax, the ultraprecision machine is now available to perform advanced measurements and analysis it was designed for.
With the addition of low-cost, user-friendly, icon-based software, the manual machine continues to be one of the most heavily used pieces of equipment for the production part approval process. As proficiency with the software and its capabilities improves, Wicker believes use of the CMM will continue to increase, improving departmental productivity and postponing the need to buy an additional CMM.
For more information, contact Brown & Sharpe, 200 Frenchtown Rd., Precision Park, North Kingston, RI 02852-1700. Tel: 401-886-2000; Fax: 401-886-2727.
